Install the in.touch 3 EN (Home) module
Last updated 3 months ago
Overview
The EN module is the home-side part of the in.touch 3 system. It connects directly to your main Wi-Fi router using an Ethernet cable and allows your spa’s CO module to communicate with the Gecko App through the Gecko cloud.
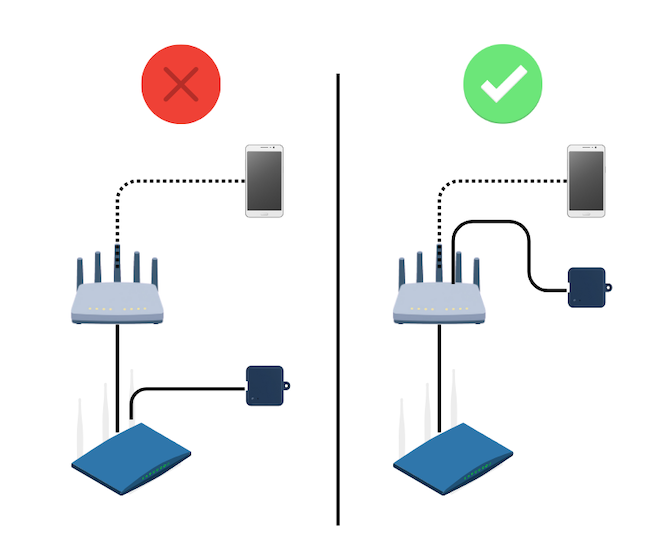
Where to connect the EN module
✅ Recommended: your main router
Connecting the EN module directly to your main router's LAN port gives you the most stable, predictable connection. This should always be your first choice.
When a mesh node or extender can help
If your main router is far from your spa, the distance between the EN and CO modules may weaken the RF link between them. In that case, connecting the EN module to a mesh node or Wi-Fi extender that sits closer to the spa can shorten that distance and improve the connection.
Keep in mind:
The main router is still the preferred option. Try it first.
Only move to a mesh node or extender if the router is too far from the spa or the RF signal is weak.
Whichever device you use, it must have an active internet connection.
Follow the steps below to install and power the EN module safely.
Before you begin
Complete the CO module (spa module) installation first.
Make sure your main home router and a power outlet are accessible.
Ensure your internet connection is active.
⚠️ Do not plug in the EN module until the CO module is installed and your spa power has been restored.
Step 1: Choose a location for the EN module
Place the EN module indoors, close to your main Wi-Fi router, in a dry and well-ventilated area.
Avoid locations near moisture, heat, or direct sunlight.
Optimize placement and signal quality
Proper placement of the EN module is essential for a stable connection with your spa.
Install near the main router
Connect the EN module directly to your main router’s LAN port and place it nearby for best performance.Keep it in an open area
Avoid placing the module inside cabinets, behind furniture, or enclosed spaces. Open placement improves signal strength.Avoid floor and metal surfaces
Do not install the module directly on the floor or near metal enclosures, as these can weaken the signal.Check signal strength in the app
You can reposition the EN module and monitor signal strength in the app. Aim for at least 3 signal bars for reliable performance.Avoid interference sources
Keep the EN module away from devices that may cause interference, such as:Large power supplies
Motors
Dense wiring or electrical panels
Step 2: Connect the Ethernet cable
Locate a free LAN (RJ45) port on your main router.
Plug one end of the included Ethernet cable into this port.
Plug the other end into the LAN port on the EN module.
💡 Tip: Most routers label Ethernet ports as “LAN 1,” “LAN 2,” etc. Any open LAN port on the main router will work.
Step 3: Connect the power supply
Plug the supplied power adapter into a nearby wall outlet
120V in North America
220V in Europe
Connect the adapter’s micro-USB connector to the EN module’s power port.
The LED light on the EN module will turn on, confirming it has power.
Step 4: Verify LED indicators
The LED on the EN module provides key information about its status:
If the LED does not turn on, verify the power connection and outlet.
(For more details, see the LED status reference guide.)
Safety reminders
Use only the power supply provided with the in.touch 3 EN module.
Do not disassemble the module or expose it to water.
Keep it away from heat sources and metal enclosures that may interfere with signal strength.
Was this helpful?
Still need help? Ask the team